This is the only assignment in Architecture, Culture & History which is a group assignment. Me, Jackee, Heidi, Pei Mun, Carmen, Christine and Natacia are in a group. We are given Royal Selangor Club Kuala Lumpur for this assignment and we decided to use Little Moreton Hall as a comparative architecture. We chose Little Moreton Hall because both of the architecture have the same Mock Tudor style which is easier to be compared. In this assignment, I learnt a lot about the characteristics of Mock Tudor style.
 |
| P.s more pictures will be shown in the powerpoint link below |
 |
| Our group photo |
 |
| Royal Selangor Club |
Presentation Powerpoint Link : https://drive.google.com/file/d/0B0XSm2gNOonVQ2ZNYndVRElRNW8/view?usp=sharing
This is individual project. The first thing to do in this assignment is find a double storey house floor plan. I took a floor plan with specifications from Ecoworld Santuary. It is a double storey bungalow in KL. After reading through the specifications, I decided to do sliding door and steel roof truss construction details. From this assignment, by drawing the construction details, it let me understand the details easily.
Project Brief Link : https://lookaside.fbsbx.com/file/Project%202%20Brief%20-%20B.Con%201%20March%202017.pdf?token=AWwuPRdlQmLVHmYEdj2rcnqKRt3RJyD90i1t0XDZUDJjYqAdwJ3SawzfMIpm7_au4Yr01vkgsEwGU6c0ODiwwl4Noz7DKJ7_K6W46CdLEad-kOoTqPqvKzpCNSN5lCf-ns87hT-bzl_wQh6JD6axx_wbCpRQIm4ms9-ZRmGHOf3Cig
This is a group assignment. I'm in group with Elvis, Pei Mun, Sunny, Shu Yen, and Tasnia. Finding a construction site that allowed us to visit was the hardest part of this assignment. All of us contribute in finding construction site and finally, Pei Mun and Elvis found us this construction site which is a 4-storey bungalow at Bukit Damansara. We visited the place together and there's an architect who guide us and told us every single details of this under construction bungalow. I gained a lot of knowledge by visiting this construction site, from foundation to roof. After that, we distributed job scope to do the report. I would like to thanks my groupmates. If without them, I don't think we can finish it on time.
 |
P.S construction pictures are in the project
|
Project Brief Link : https://lookaside.fbsbx.com/file/b.con1%20project%201.pdf?token=AWyON11FqNewuO7c-XuTPBdQ2NP6A1ZDUkRLIKlutl_q0dZyey6tQEpgGfy7Zxl3MGMQc9oXwFgqWBbOKlH81MpZ5ydvc8eWTbaNEp6D40cQHjOoX_-jV7OShoOg4TctRhdQZ-V6aWERQddDwfX_JtgdGCd5fzUuZRGz0UKhZ-2L7Q
Softcopy of Project : https://drive.google.com/file/d/0B0XSm2gNOonVT1htR0dVMXR3aEE/view?usp=sharing
After the checkpoint of the phrase 1, I decided my activities: skateboarding (active) and resting (passive) but the context I chose is not suitable for these activity. I did some research and found out this interesting skate park at California called Lake Cunningham Regional Skate Park. It is surrounded by mountains and greens. I used a part of the skatepark to support my pod so that it is beyond the ground. There's few things we need to consider : massing, circulation, context positioning, form and space. So, after i chose the context, I start to play with the massing. As my keywords from previous assignment are relaxing, curvy and organic. Therefore, I came out an idea of using the s-shape.
 |
| Step 1 - Massing with max volume 128m |
 |
| First mock up idea |
 |
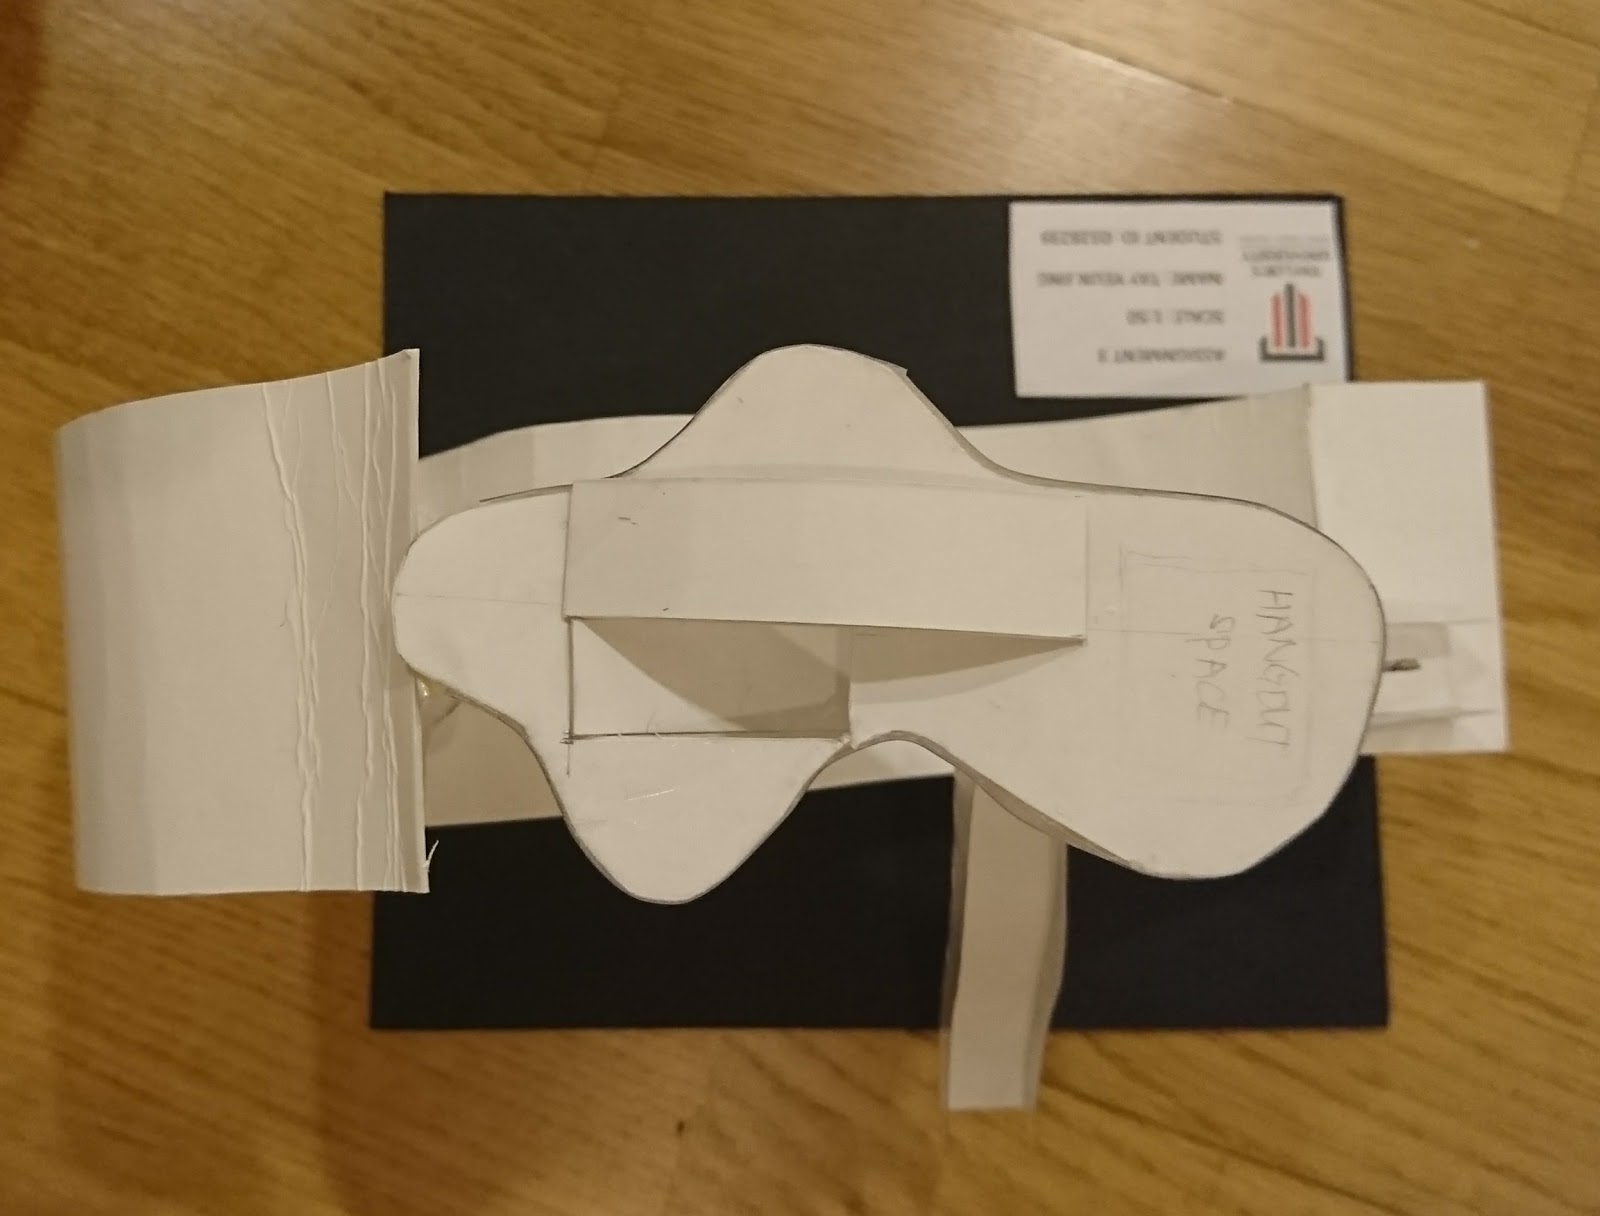
| Incomplete mock up. No fittings, no form, no circulations. |
 |
| Continuing idea and development. |
Knowing that previous mock up didn't work out, an idea of using irregular organic shape (inspiration from the previous light piece) as a form or an enclosed space for passive activity.
 |
| Second mock up. No fittings, too flat for the side and doesn't look like a piece. |
Crit 1 on 15 June 2017
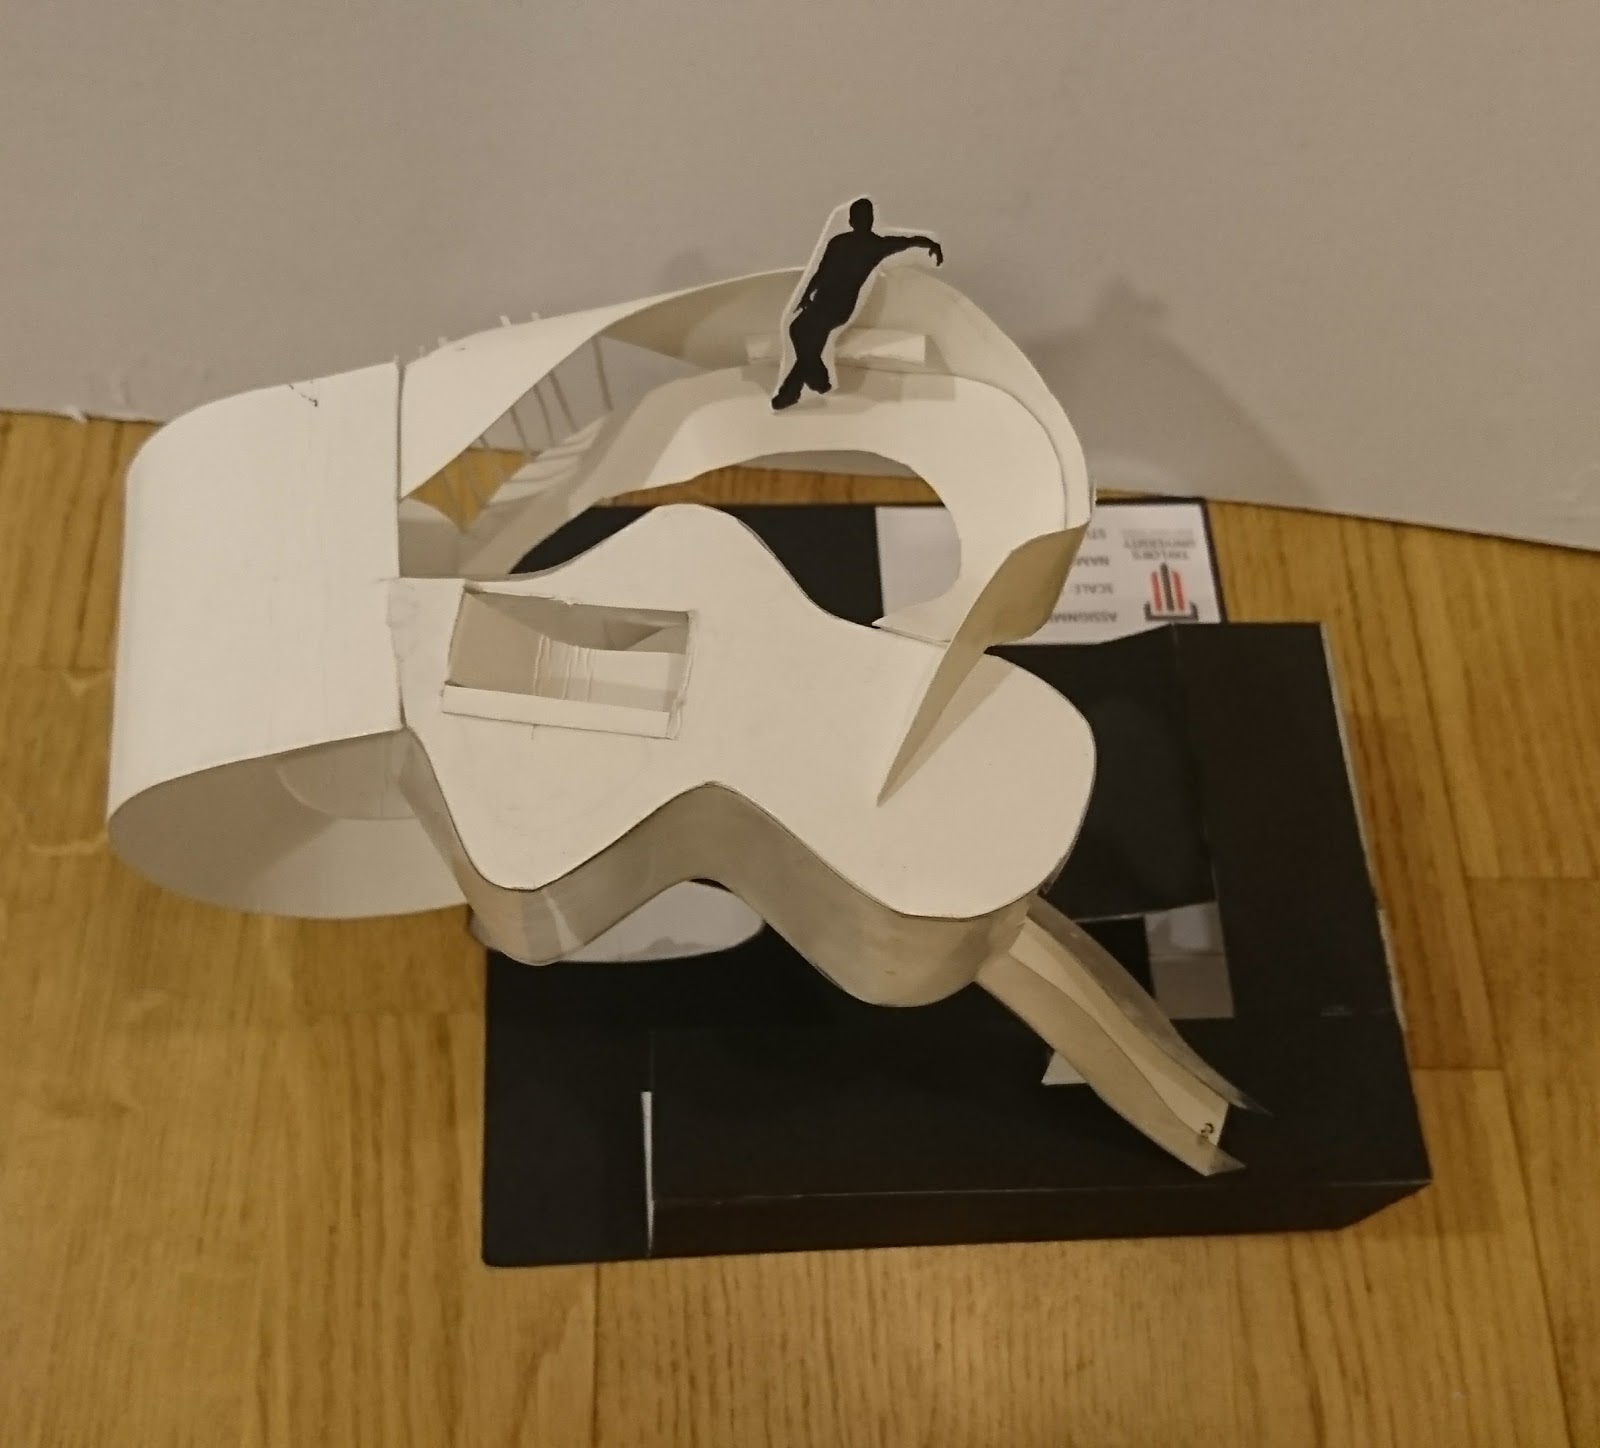
After having feedback from my lecturers, I decided to make the enclosed space slanted so that it doesn't look flat from the side. I also added a ramp to the roof as my fittings.
I continued my development. I did some corrections before the second crit. I added a platform for passive activity. Then, I added strips and a slide fitting to enclose the too open space. Lastly, I curved the roof so that the human figure can pass through.
Crit 2 on 6 July 2017
 |
| An eye icon as the strips design but I feel it doesn't suit the pod . |
As I feel the eye icon doesn't suit my pod, I changed to simple strips.
Final model
This week, we are going back from 2D to 3D! But this time is without model reference, just using our previous plan section drawings as reference. Before we proceed to draw axonometric which is levelling, we practiced on isometric. Isometric is the combination of three different view (plan, elevation, and side). I feel that I was back to form 5 last chapter of mathematic drawing, just that this time we need to use angle to draw. There's two angle we can choose, either 45-45 or 30-60.
After that, we did axonometric by using the same method of isometric. As I had mentioned before, axonometric is levelling, so we need to project lines to draw the second level/mezzanine floor. For axonometric, it has more interior spaces to draw compared to isometric which I just need to draw the form.
Every design com. class I learn new things which it's really useful! Enjoy having this subject!
 |
| Exercise of isometric |
 |
| Draft for axonometric |
 |
| Axonometric on A2 tracing paper |
By using the model making house as our reference, we need to draw the floor plans and section of the model. We need to imagine it as a flat 2D. From 3D to 2D on paper with accurate measurements. From this assignment, i learnt about the different symbols of the materials, doors and window. I also know how to label and use different line weight to indicate thickness. There's also different types of line such as central line between the wall also section lines.
After we did the floor plan, sections were so easy to be done! By projecting lines, we save a lot of time without measuring the measurements again. It is a quick way to finish the work. All we need to do is get the height to fit in it. Drawing section also need some of our imagination if we doing it without the model as reference. And we need to know where we cut the section line; which part of the drawing can be ignored.
 |
| Draft of plan |
 |
| Plan on tracing paper using pens |
 |
| Section B-B and C-C on cartridge paper using pencils. Done in class. |
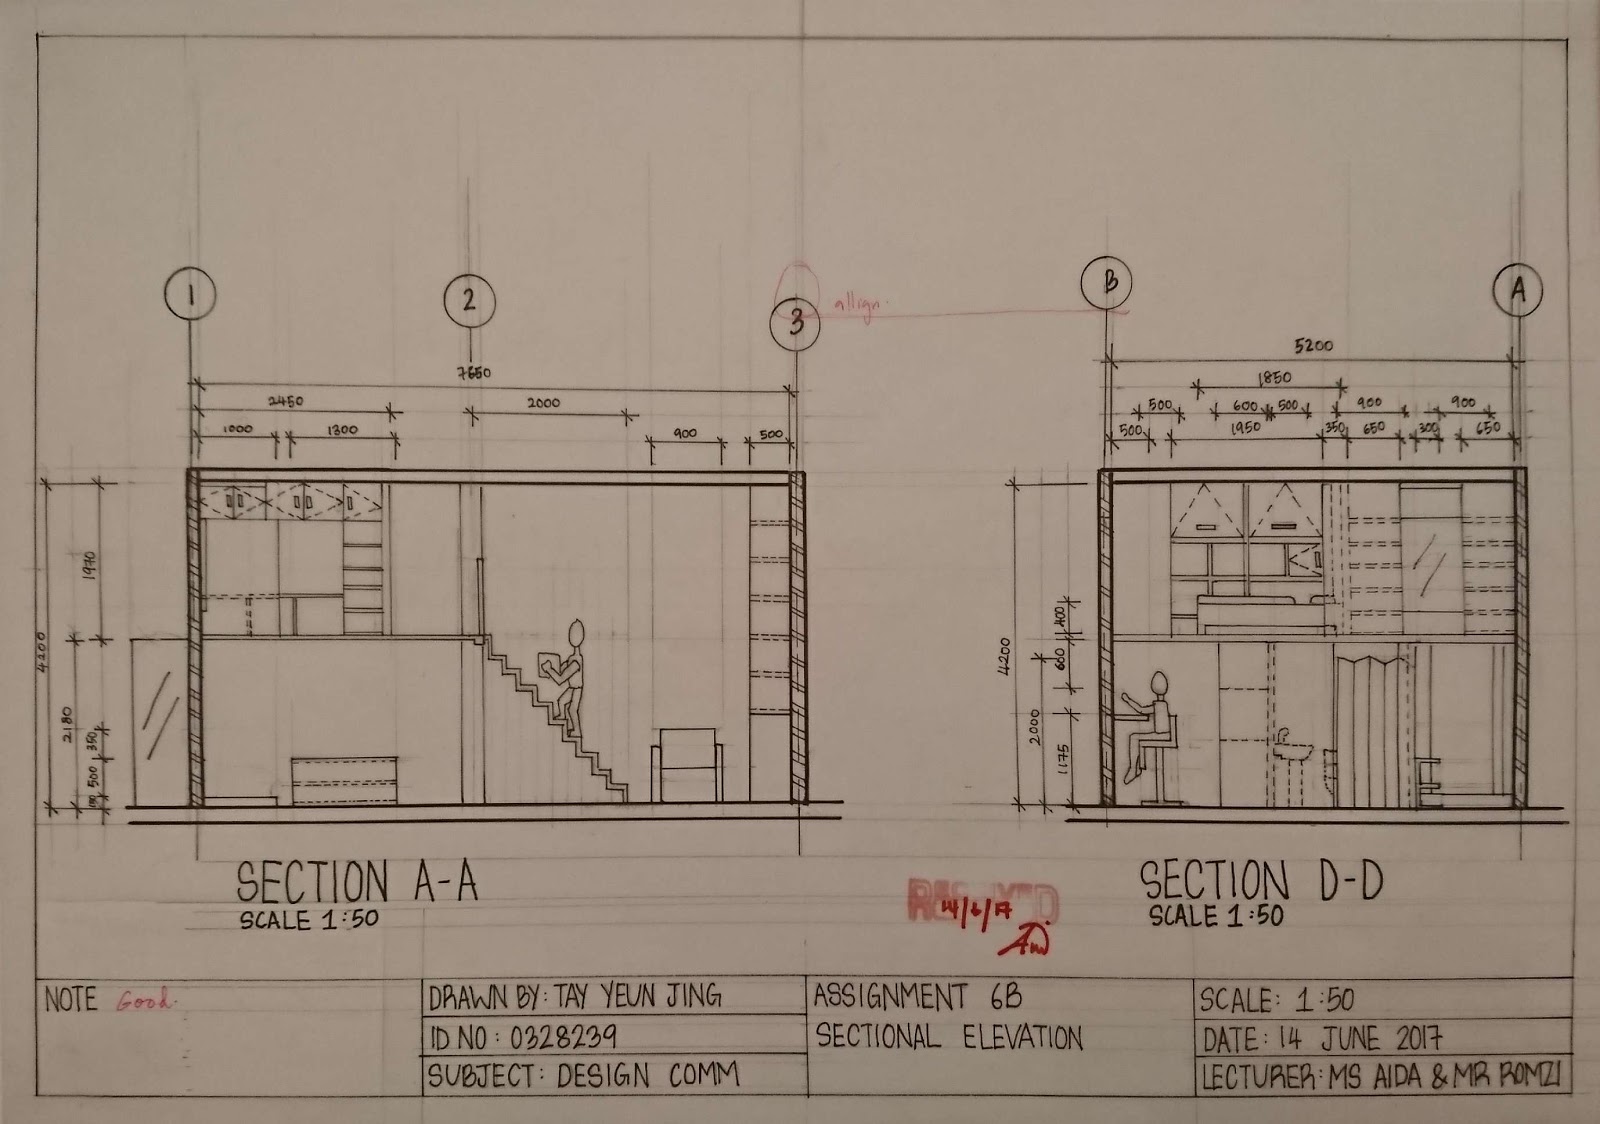 |
| Section A-A and D-D on tracing paper. |
This is my first time doing a proper orthographic projection because I hadn't take lukisan teknik in my high school. It's so fun doing it as I really like drawing formal thing than curvy shapes. I also like numberings such as measurements and calculations *maybe I have a strong mathematics gene from my dad's family xD*
Well, back to the topic, there's a lot to learn for me. First of all, the line weight. Thicker line weight indicate the object is in front. 2H line weight as construction and projection line. HB line weight for title block's borders. Second is the type of lines. Use dash line to show hidden objects. Central line have a cross and line must be extra than the circle. Lines for measurement needed to be connected until the last measurement. Then, the 45 degree line. This is my first time using T-square and set square in a professional way. I didn't know set square and t-square can be so useful and it save my time and energy a lot by just projecting 90 degree to the 45 degree line.
Overall, it's a brand new lesson for me and I like it so much!
 |
| Assignment 5a on cartridge paper using pencils |
 |
| Assignment 5b on tracing paper using pens |